Showing posts with label speaker. Show all posts

Friday, July 15, 2016

Pitch follower using the tone() function


This example shows how to use the tone() command to generate a pitch that follows the values of an analog input. Using a photoresistor (LDR) your Arduino board becomes a simplified light theremin.

Step 1: What You Need?

1 x Arduino Board (Arduino UNO used in this tutorial)
1 x 8 Ohm Speaker
1 x Light Dependent Resistor (LDR) / Photoresistor
1 x Mini Breadboard
Male-to-Male Jumper Wires 

Don't have components? Don't worry. Just click the component's name. 


Step 2: Build Your Circuit.

Connect one terminal of your speaker to digital pin 9 through a 100 ohm resistor, and its other terminal to ground. Power your photoresistor with 5V, and connect it to analog 0 with the addition of a 4.7K resistor to ground.


Step 3: Upload The Code.

1. Select the Arduino board type: Select Tools >> Board >> Select your correct Arduino board used.


2. Find the port number by accessing device manager on Windows. See the section Port (COM&LPT) and look for an open port named "Arduino Uno (COMxx)". If you are using a different board, you will find a name accordingly. What matters is the xx in COMxx part. In my case, it's COM3. So my port number is 3.

Select the right port: Tools >> Port >> Select the port number.


3. You can find this code in the example of Arduino IDE.
Select File >> Examples >> 02.Digital >> tonePitchFollower


Click press the "upload" button (see the button with right arrow mark).
The code for this example is very simple. Just take an analog input and map its values to a range of audible pitches. Humans can hear from 20 - 20,000Hz, but 120 - 1,500 usually works pretty well for this sketch.

You'll need to get the actual range of your analog input for the mapping. In the circuit shown, the analog input value ranged from about 400 to about 1,000. Change the values in the map() command to match the range for your sensor.


Download: 


Arduino Arduino UNO R3 Basic LDR library photoresistor speaker

Playing tones on Multiple outputs using the tone() function


This example shows how to use the tone() command to play different notes on multiple outputs.

The tone() command works by taking over one of the Atmega's internal timers, setting it to the frequency you want, and using the timer to pulse an output pin. Since it's only using one timer, you can only play one note at a time. You can, however, play notes on different pins, sequentially. To do this, you need to turn the timer off for one pin before moving on to the next.

Thanks to Greg Borenstein for clarifying this.


Step 1: What You Need?

1 x Arduino Board (Arduino UNO used in this tutorial)
3 x 8 Ohm Speaker
3 x 100 Ohm Resistor 

Don't have components? Don't worry. Just click the component's name. 

Step 2: Build Your Circuit.


Step 3: Upload The Code.

1. Select the Arduino board type: Select Tools >> Board >> Select your correct Arduino board used.


2. Find the port number by accessing device manager on Windows. See the section Port (COM&LPT) and look for an open port named "Arduino Uno (COMxx)". If you are using a different board, you will find a name accordingly. What matters is the xx in COMxx part. In my case, it's COM3. So my port number is 3.

Select the right port: Tools >> Port >> Select the port number.


3. You can find this code in the example of Arduino IDE.
Select File >> Examples >> 02.Digital >> toneMultiple

Click press the "upload" button (see the button with right arrow mark).

The sketch below plays a tone on each of the speakers in sequence, turning off the previous speaker first. Note that the duration of each tone is the same as the delay that follows it.
Arduino Arduino UNO R3 Basic library speaker

Play a Melody using the tone() function


This example shows how to use the tone() command to generate notes. It plays a little melody you may have heard before.

Step 1: What You Need?

1 x Arduino Board (Arduino UNO used in this tutorial)
1 x Piezo Buzzer or Speaker
Male-to-Male Jumper Wires 
Female-to-Male Jumper Wires (For Buzzer)

Don't have components? Don't worry. Just click the component's name. 

Step 2: Build Your Circuit.


Step 3: Upload The Code.

1. Select the Arduino board type: Select Tools >> Board >> Select your correct Arduino board used.


2. Find the port number by accessing device manager on Windows. See the section Port (COM&LPT) and look for an open port named "Arduino Uno (COMxx)". If you are using a different board, you will find a name accordingly. What matters is the xx in COMxx part. In my case, it's COM3. So my port number is 3.

Select the right port: Tools >> Port >> Select the port number.


3. You can find this code in the example of Arduino IDE.
Select File >> Examples >> 02.Digital >> toneMelody


Click press the "upload" button (see the button with right arrow mark).
The code below uses an extra file, pitches.h. This file contains all the pitch values for typical notes. For example, NOTE_C4 is middle C. NOTE_FS4 is F sharp, and so forth. This note table was originally written by Brett Hagman, on whose work the tone() command was based. You may find it useful for whenever you want to make musical notes.


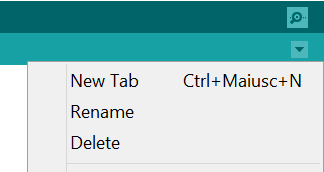
To make the pitches.h file, either click on the button just below the serial monitor icon and choose "New Tab", or use Ctrl+Shift+N. Then paste in the pitches.h code.


Download: 


Arduino Arduino UNO R3 Basic buzzer library speaker

Simple keyboard using the tone() function


This example shows how to use the tone() command to generate different pitches depending on which sensor is pressed.

Step 1: What You Need?

1 x Arduino Board (Arduino UNO used in this tutorial)
3 x 10k ohm resistor
1 x 8 Ohm Speaker
3 x Force Sensing Resistor 
1 x 100 Ohm Resistor 

Don't have components? Don't worry. Just click the component's name. 

Step 2: Build Your Circuit.


Connect one terminal of your speaker to digital pin 8 through a 100 ohm resistor, and its other terminal to ground.

Power your three FSRs (or any other analog sensor) with 5V in parallel. Connect each sensor to analog pins 0-2, using a 10K resistor as a reference to ground on each input line.

Step 3: Upload The Code.

1. Select the Arduino board type: Select Tools >> Board >> Select your correct Arduino board used.


2. Find the port number by accessing device manager on Windows. See the section Port (COM&LPT) and look for an open port named "Arduino Uno (COMxx)". If you are using a different board, you will find a name accordingly. What matters is the xx in COMxx part. In my case, it's COM3. So my port number is 3.

Select the right port: Tools >> Port >> Select the port number.


3. You can find this code in the example of Arduino IDE.
Select File >> Examples >> 02.Digital >> toneKeyboard


Click press the "upload" button (see the button with right arrow mark).

The sketch below reads three analog sensors. Each corresponds to a note value in an array of notes. If any of the sensors is above a given threshold, the corresponding note is played.

The sketch uses an extra file, pitches.h. This file contains all the pitch values for typical notes. For example, NOTE_C4 is middle C. NOTE_FS4 is F sharp, and so forth. This note table was originally written by Brett Hagman, on whose work the tone() command was based. You may find it useful for whenever you want to make musical notes.

To make the pitches.h file, either click on the button just below the serial monitor icon and choose "New Tab", or use Ctrl+Shift+N. Then paste in the pitches.h code:


Download: 


Arduino Arduino UNO R3 Basic library speaker


  • Copyright © Arduino Tutorial ™ is a registered trademark.
    Designed by Templateism. Hosted on Blogger Templates.