
Our skin is amazing! It provides a medium for us to experience the sense of touch, it keeps infections out and keeps innards in but I bet you didn't know that our skin changes conductivity depending on many different things one being our mood! It called Electrodermal activity (EDA) and there's a really interesting Wikipedia page you can read here. The basics are that our skin changes its conductivity depending on how we feel.
We have to start by asking the subject some easy questions we know they will answer truthfully like "what is your name" and "where do you live" to get a baseline and from there we can start asking questions that they may lie about, if they do they would probably feel nervous and then we can read the change in the base line that be established earlier if they lie.
Step 1: What You Need?
1 x Mini USB Cable
1 x Red LED
1 x Green LED
1 x Orange LED or Yellow LED
1 x 2k Ohm Resistor
Wires
Materials
- Cardboard
- Tinfoil
- Velcro
Tools
- Soldering Iron & Solder
- Hot Glue
- Craft Knife
Don't have components? Don't worry. Just click the component's name.
Step 2: Build Your Circuit.

- Connect a long piece of cable to Arduino analog pin 0.
- Connect the 2k resistor to ground and the the extended analog 0 pin.
- Connect a long piece of cable to Arduino 5 volt pin.
- Connect the anode (long leg) of the green led to pin 2 and the cathode (short leg) to ground.
- Connect the anode of the orange led to pin 3 and the cathode to ground.
- Connect the anode of the red led to pin 4 and the cathode to ground.
Step 3: Upload The Code.
The main piece of software we are going use is the newest version on the Arduino IDE. The new update brings a new way to see the data being received from the Arduino, instead of being in text form from the serial monitor, it can now be displayed in a real time graph which will help us identify when the data changes its pattern (when someone lies)


To open the plotter open Arduino and navigate to the tools menu and you should see it there just below serial monitor.
Step 4: Making The Finger Clips.


Lets start by gluing a strip of tinfoil to the bottom of a strip of velcro, do this for both pieces of velcro (the hook and the loop. Now rap it around your finger until it makes a tight fit (check photos) then tape the exposed wire from analog pin 0 to the tin foil and repeat this step for the 5 volt pin (make sure it makes a good connection).
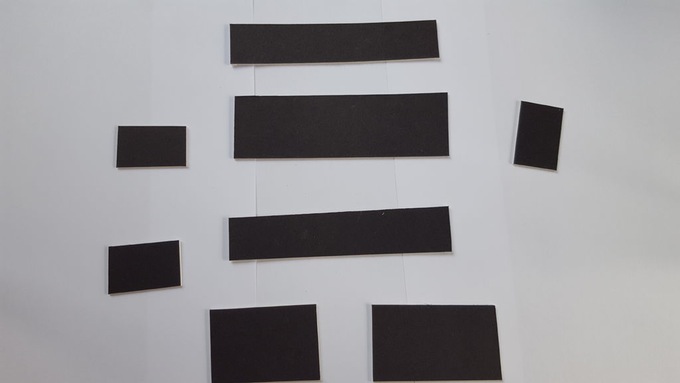
Step 5: Making The Case.

The plan is to make a small compartment for the finger pads to fold away and to have three holes for the LEDs to stick out. Its going to be made out of cardboard and to make it we will need to cut the following shapes out:
- Cut two 15x3 cm rectangles
- One 15x5 cm rectangle
- Three 5x3 cm rectangles (cut a square in the middle on one of them for the nano usb)
- One 9x5 cm rectangle
- One 6x5 cm rectangle


Step 6: Putting It All Together.

The last thing we need to do is put the electronics in the case start by gluing down the Arduino and all wires in the 6cm side and run the extended wires (pin analog 0 and 5 volt) to the other side of of the rectangle (9cm side). Now glue the three LEDs to the holes we made on the 6x5cm rectangle and give it a test if all goes well you should have a small portable Arduino lie detector but let me warn you this isn't the most accurate system in fact most real lie detectors use a host of other sensors to determine if someone is lying such as a heart rate monitor and others, what I'm saying is don't uses the result of this for serious questions.

My Robot Education Sdn. Bhd. (Robotedu.my) was founded in 2015 as the first robotics education centre in Malaysia to provide Arduino-based robotics courses for youths. Our vision is to be able to provide robotics education to every youth in Malaysia.


Code not found
ReplyDelete"The requested URL /embed/sketch:362550 was not found on this server."
Could you point me to the correct location
Great tutorial, Thanks
Really great content and highly appreciated your efforts. keep sharing your efforts with us.
ReplyDeleteArduino Training in Lahore
Hi sir ,
ReplyDeleteI read your blog topics that are are very simple and informative for us.So I really thankful to you for this work.
Aeduino Training
What is a casino site? - Lucky Club
ReplyDeleteSome casinos offer live blackjack, roulette, video poker and other games, but you will find more than what you might need for a good luckyclub one. In addition, online gambling