
Donation boxes can be much more interesting and attractive when you combine them with electronics and a little bit of programming. This tutorial will show you how to. As the name explains, making donation boxes interactive can help you gain much more attention and make people happy at the same time! Indeed, and awesome way to set up a charity and help the needed ones by installing it in shopping complexes and other public places (if a bigger version of the same is made). This was just a prototype to present the basic idea which when modified and used at a bigger level, can definitely help.
The following project uses an arduino for all it's processing. The RGB LEDs installed inside the box keep on flashing and changing colors which can attract much attention. When a person donates a coin, the ultrasonic sensor installed just on the box detects that and the servo present at the top waves 2-3 times with a 'Thank You' message displayed. This feature can surely bring a smile on the person's face who just donated that coin! Using only Arduino and some other basic parts, you can make this project within 3-4 hours max. without the need of hunting the parts. Although a bigger version of the same would be much better, but that doesn't mean that this small one is useless. Even this one can be put at various places.
Here is a short video of the project:
Step 1: What You Need?
1 x Arduino UNO or Arduino Nano (Arduino Nano used in this project)
1 x USB Type-B Cable ( for UNO) or Micro-USB Cable (for Nano)
Male-to-Male Jumper Wires
Female-to-Male Jumper Wires
Female Header
Male Header
1 x Computer with Arduino IDE installed
1 x Cardboard box (approx 6" x 6" x 6" or a shoe box)
Brown paper
Transparent sheet
Female-to-Male Jumper Wires
Female Header
Male Header
1 x Computer with Arduino IDE installed
1 x Cardboard box (approx 6" x 6" x 6" or a shoe box)
Brown paper
Transparent sheet
Tools:
- Soldering iron
- Solder wire
- Hot glue gun
- Paper glue
- Wire cutter/stripper
- Pliers
Cable Cover
Arduino Compatible UNO Ultimate Starter Kit / Learning Kit
USB To Power Jack Cable
Arduino Compatible UNO Ultimate Starter Kit / Learning Kit
USB To Power Jack Cable
Don't have components? Don't worry. Just click the component's name.
Step 2: Make A Shield For Arduino

The very first step to start this build is to make a shield for Arduino. As I do for all of my projects, making such a shield will greatly help you to make all the connections easy by use of jumper cables. This also eliminates the need of soldering everything up which can sometimes be time consuming. You can just plug in and out your Arduino to be used in other projects at the same time. However, this won't be mandatory for UNO users.
For making the shield, just check for the number of pins on your Arduino and solder the same number of female headers on a piece of perforated board. Check if your Arduino fits in easily. Now solder male headers corresponding to each pin on your Arduino. Add some extra headers 5v and Gnd pins which are more frequently used.

Step 3: Cover Your Box

Now moving a little away from electronics, here comes some craft work. You have to now cover your box with some colored paper. But before that, it can be sometimes difficult to find the correct box to suit your needs. If you want to make it just as a project, then the best way is to hunt for shoe boxes, courier boxes or you can even make one from some scrap cardboard. I used a camera box which was just the perfect one.

You can cover the box with any colored paper you want. For making it simple, I used plain brown paper as I don't have much experience and designing skills in art and craft. You can even add some patterns, decorations to make it look more attractive. As for mine, I simply took the measurements, cut the paper and covered all the sides of the box with it.

Step 4: Make The Front Side Transparent

A pretty interesting feature, this can make the box look much better and will also allow to add some LED lighting inside the box. So I chose to cut the front part and cover it with transparent sheet.
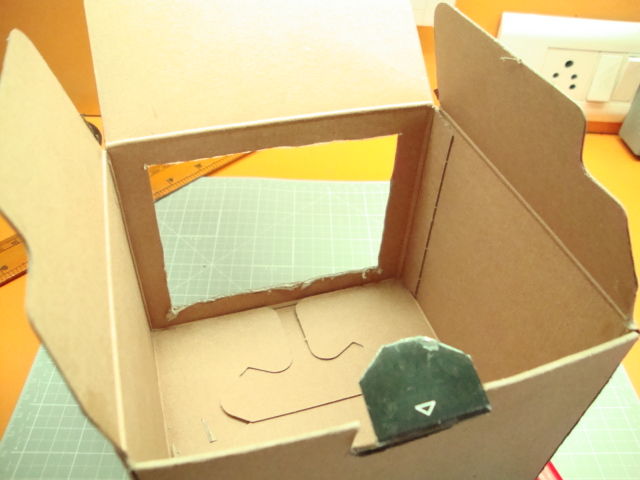
You just have leave some of the cardboard to the front side and cut the rest of it (dimensions depend on the size of your box). Cover the cut part with transparent sheet which should be tight and shouldn't sag.

Instead of that thin sheet, you can use acrylic/plexiglass or even ordinary glass to cover the front portion to make the project more permanent. I have no experience on working with glass so chose an easier option.
Step 5: Cut A Coin Slot

This one's very easy. You just have to cut a big coin slot for the coins to be donated inside. Simply cut out a rectangular part measuring about 1.4" x 0.3". It should be big enough for all types of coins to pass through.

Step 6: Mount And Connect The Servo


Connect it to Arduino as per the following:
- Vcc (red) of Servo to 5v of Arduino
- Gnd (black) of Servo to Gnd of Arduino
- Signal (yellow) of Servo to Arduino digital 3 (PWM)


Step 7: Solder And Connect The RGB LEDs


First solder all the four LEDs to a piece of perfboard. Connect all the four terminals of each LED in parallel. Please note that the LED type used here is common cathode.


The most important component if this project, this ultrasonic sensor detects when a person donates a coin. Since it can detect distance, when your hand comes near the coin slot, the distances detected by the sensor becomes much less as compared to earlier when there was no obstacle in front of the sensor. For the particular project, we can say that someone donated something when the distance detected by this sensor becomes less than 4cm.


Please note that the sensor used here is NOT HC-SR04 type (the one with four pins). I have used a Ping ultrasonic sensor which has 3 pins connected instead of 4. You can also use the earlier one but only with some modifications in the code. The Ping type sensor can give you much accurate measurement at a faster reaction rate.
Anyways, connect it as per the following:
Finally, mount the sensor at a distance of approx 2-3cm. Make sure that the sensor doesn't completely touch the base.
Finally, mount the sensor at a distance of approx 2-3cm. Make sure that the sensor doesn't completely touch the base.
Step 9: Upload The Code

Now, upload the code given in the ino file below to your arduino. Be sure to set the correct board and serial port in your IDE before uploading.
Step 10: Finishing Touches

Any other quotations, messages, boards and other modifications can be made as well. That depends upon you. Usually, adding some interesting quotes can give you more attention. I tried to keep mine as simple as possible.
Step 11: Powering The Project


There are various other options as well, like using a 9v battery or a powerbank (as in the image above) to make the project portable. For the battery, connect the positive terminal to Arduino vcc whereas negative terminal to Arduino gnd. Powerbank simply needs to be connected with a USB cable.
Step 12: You're Done!

Now you're finally done making your own interactive donation box! Since this project uses an Arduino, it's completely open-source which means you can make as many modifications as you want. You can even make a bigger version of the same and install it in exhibitions, shopping complex etc. This was just a way to present the basic idea which can be very interesting and beneficial when done on a large scale.
You are free to ask any questions if you want. Don't forget to follow, comment and share it with your friends!
Thanks for watching!!!
Download:

My Robot Education Sdn. Bhd. (Robotedu.my) was founded in 2015 as the first robotics education centre in Malaysia to provide Arduino-based robotics courses for youths. Our vision is to be able to provide robotics education to every youth in Malaysia.


0 comments:
Post a Comment